Custom fields

Monday, October 11, 2021

Adding, managing and using custom fields in Loyalistic.

Sometimes you need to collect more information than just those standard fields Loyalistic offers. For instance, if you are arranging an event, you may want to ask your customers about dietary restrictions. Or you may want to allow your leads to describe what their company does in detail.

With custom fields, you decide what information is collected using the honeypot forms.

Managing custom fields

Creating new custom fields

You can manage custom fields in Settings / Fields. To add a new field, click on the New field button.

Label

First, give your new field a label. The label is visible on the contact form next to the field.

Field name

After you have added a label, you get a suggestion for the field name. The name is used as the technical key when storing the field values and it must be unique. Usually the suggested value works best.

Type

Next, select the type of the new field. The following types are available:

Checkbox list
One or more checkboxes.
Drop-down list
A list of selections, of which the user can select one.
Email address
Field for email address input. The format is validated by the user's browser.
Multiline text
A text area, with several rows for text.
Number
A text field that accepts only whole numbers.
Phone number
Field for phone number input. The format is validated by the user's browser.
Radio button list
A list of radio buttons, one of which can be selected at a time.
Text
One row of text, the basic text field.

Options

Options are basically the available values for a checkbox list, a drop-down list or a radio button list. You define which options/values are available. Each option has two (2) text fields:

  • Value: the actual value of the field.
  • Label: the text that is shown the the user.

For example, if you want to add language selector, you could use a drop-down list and add the following options:

  • Value: EN, Label: English
  • Value: FR, Label: French
  • Value: GE, Label: German

The user is then presented with a drop-down list with three options: English, French and German. And if the user selects French, the value "FR" will be then saved to the contact.

Description

This is the description for the custom field. It's only visible to you and your colleagues.

Editing and deleting custom fields

When you have added some custom fields, you can see them listed on the Fields page.


You can edit a field by clicking on the wrench icon on the field row. You can change any other setting except the field name.

To delete a custom field, click on the trash can icon. Please note that removing a field will also remove all the information collected using that field.

Using custom fields

After you have defined some custom fields, you can start using them for example in honeypot forms.

Honeypot

The custom fields will appear in the honeypot editor. Just select which fields you wish to collect. You can toggle whether the field is required or optional by clicking on the field checkbox. Required fields are denoted with an asterisk on a red background, and optional fields with a check mark on a green background.

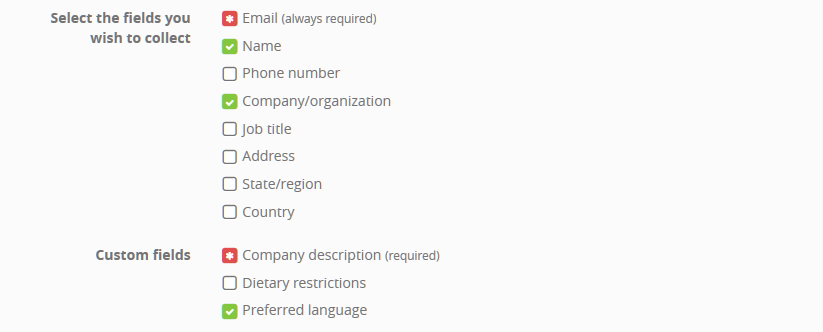
In the screenshot above, Company description field is required and Preferred language field is optional.
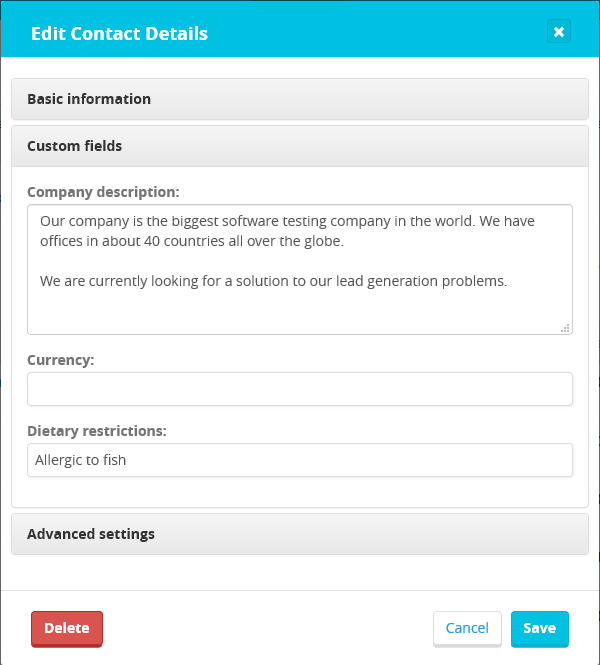
Contact

The defined custom fields are also visible when editing a contact. These fields can be found under the Custom fields tab, where you can view and edit them as necessary.

Import contacts to Loyalistic from a file

Monday, October 11, 2021

If you already have contacts you would like to import to Loyalistic, here's who to import them using a file (e.g. from Excel).

Importing contacts to a list

  1. Select Settings (the gear icon) / Lists from the upper-right corner.
  2. Open the target list by clicking on it.
  3. Click on the Import button and select From a file...
  4. In step 1, copy the contact data you wish to import (e.g. copy the rows from Excel) and paste them to the Data to Import text box.
  5. The system tries to guess the correct delimiter for the columns in your data. You can set the delimiter yourself by checking the correct Column Delimiter radio button.
  6. Click Next to continue.
  7. In step 2, you can see your data parsed into columns. Define which column contains which piece of information by using the dropdown boxes above the columns.
  8. Optionally, you can set a basis for processing for the contacts when importing.
  9. Also, if you wish, you can clear the list before importing the new contacts by checking the Clear the list before importing the contacts checkbox. Unsubscribed contacts will not be removed from the list.
  10. Finally, import contacts by clicking on the Import button. Please note that if you import a large number of contacts at once, it may take a while for the import to complete.

Personalizing emails

Monday, October 11, 2021

You can personalize emails by adding the recipient's first and/or last name, as well as their email address, to the email. This can be done by inserting a special data tag into the email body.

Use {data:FirstName} to add the first name, {data:LastName} to add the last name, and {data:Email} to add the email address of the recipient.

For example, to add a personalized greeting, you could start your email by writing:

Hello there {data:FirstName}

In the actual email it would then become for example:

Hello there Jordan

If the recipient's name is not known, the data tag will just be omitted.


List of personalization tags

Setting up a nurture program for Honeypot

Monday, October 11, 2021

Creating a new program

Make sure you have logged in to Loyalistic at https://app.loyalistic.com/suite/.

  1. From the top navigation menu, select Nurture.
  2. On the Nurture page, select New nurture program... in the upper right corner of the page.
  3. Give a name to your nurture program and click Create.
  4. To create a new step (i.e. a scheduled email) to your nurture program, click New step.
  5. Fill out the details:
    • How long a delay to use after the contact has been added to this nurture program (e.g. when the contact filled out a Honeypot form)
    • Sender email address and name
    • Subject for the email
    • Template to be used
  6. Click Save to save the email settings. A preview image of the email will be shown.
  7. Edit the contents of the email by clicking Edit email body. The editor wil appear.
  8. Write your email contents in the editor and press Save to save the changes. The preview image will be updated.
  9. Add the desired number of steps by repeating steps 4-8.

Adding a nurture program to a Honeypot

  1. Select Honeypots from the navigation menu.
  2. Click on the name of your Honeypot.
  3. Under the Nurture Program title, select your nurture program from the dropdown menu and click Save.

Setting up Pipedrive integration

Monday, October 11, 2021

You can set up integration between Loyalistic and Pipedrive, so you can transfer contacts to/from Pipedrive CRM. For that you need a Pipedrive account (naturally), and you need to get a Pipedrive API token so Loyalistic can connect to your Pipedrive.

26 – 30 / 31