Integrating blog to your website

Monday, October 11, 2021

When your blog is ready to launch, you may want to integrate it with your website. Here is how to do it.

Adding link to blog from your site's navigation

Add link to your site's navigation so website visitors (and Google) can find it.

Check from your webmaster or web agency who build the site whether you can modify navigation yourself or whether they should do it. You are basically just adding a link, however navigation is often coded so that it might break if you go and add a link yourself.

The right place is often on top or main navigation.

However if your website is highly conversion optimized, you may prefer to link from your footer instead.

Before you add link, check that you have set your blog's domain and path the way you want them. By default, your blog is hosted at <yourdomain>.loyalistic.com/blog/ and you may prefer to have it on your custom domain, and you may want to change /blog/ part to e.g. /posts/ or /articles/ if you host your blog at let say blog.yourdomain.com to avoid repeating word blog on the full URL. You can edit these at Settings > Custom Domain and URLs.

When you are adding the link or sending it to your webmaster, check that it works and that it ends to /, e.g. http://blog.yourdomain.com/articles/.

When you add the link, visitors and Google starts to find your blog.

Now it may take quite some time before Google has indexed it, so you may speed up the process by submitting blog's URL to Google. You can do it here: https://www.google.com/webmasters/tools/submit-url?pli=1

Adding newest posts feed to your website

If you like to show your latest blog posts on your site's front page perhaps, this is how to do it.

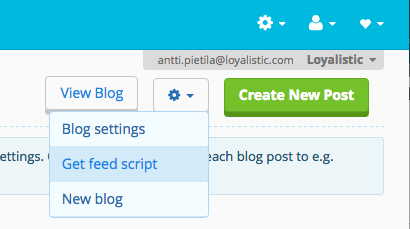
Open your blog at Loyalistic (admin side, not public). You'll find blog settings menu (cog icon) in between View Post and Create New Post buttons on the right. Select Get Feed Script.


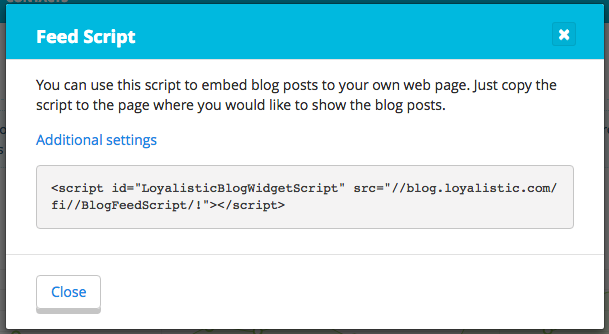
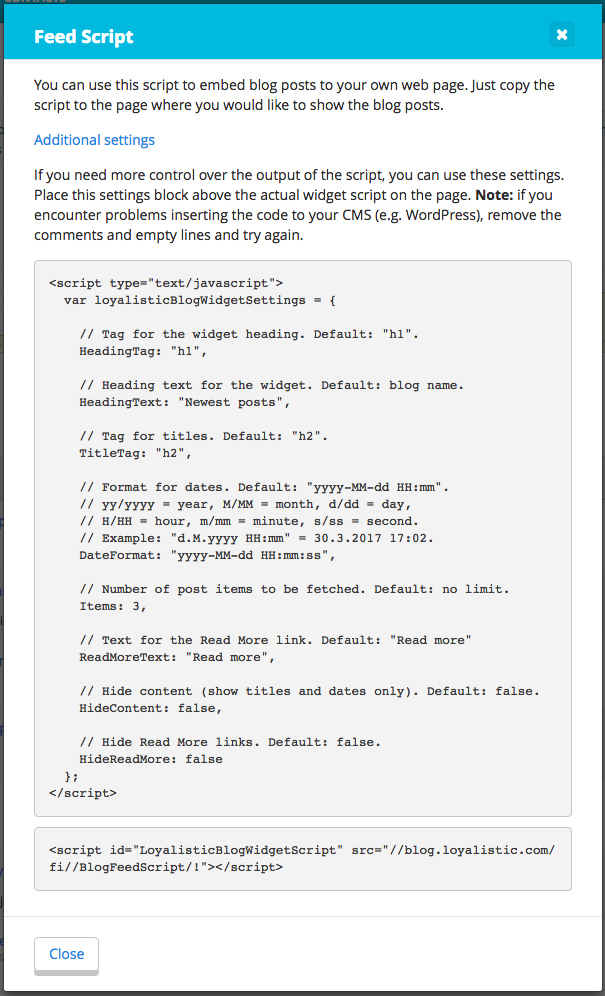
Install this script to your website where you want to show your latest posts. This widget uses your site's styling so if it does not look like you want, you can tune it with your site's CSS. If you don't speak CSS, leave it to your webmaster or agency to style it. Otherwise you easily break your site.

Check Additional Settings if you need a bit more control.


Setting up image management (getImageRight)

Monday, October 11, 2021

Loyalistic comes with a free edition of our digital asset management tool, getImageRight(tm), making it supereasy to use your images in all your content. Just upload image once and you can easily reuse it in different contents. You can even resize and crop it. 

1. Signup for your free edition of getImageRight(tm).

Signup here: http://signup.getimageright.com/signup/?lang=en-US&code=GYYbcKxhUjr8qD5

2. Use from any Loyalistic editor

Whether you are creating a landing page, blog post or email, all Loyalistic editors have getImageRight-button. 

getImageRight-button:  

Click it to login and access or upload your images. You can easily crop and resize the image. Your original image is stored for further use so you can keep on resizing and cropping without reducing quality.

3. Access full getImageRight

Loyalistic editors use embedded getImageRight. For full features, you can login to your getImageRight at: 

http://login.getimageright.com/

4. Invite users

Your getImageRight is company-wide, so invite other team members to allows you all share and access images. Invite users from Manage -> Invite Users from the full getImageRight at http://login.getimageright.com/

What happens when I have more contacts than my plan allows?

Monday, October 11, 2021

Your Loyalistic plan has a limit on how many contacts you can have with that plan.

For this limit, only working unique email addresses are counted, thus any contacts who have marketing denied or where email has bounced back are not counted.

You'll see the notification once you exceed your limit. This is a soft limit allowing you to have a bit of headroom before you hit a higher hard limit where e.g. email recipients are cut off.

So you have time to upgrade to a plan with higher limit or cleaning up your contacts. Maybe you can delete contacts that have been unresponsive to your marketing. A softer approach is to deny marketing to them, this will preserve their data and history.

Please note, that the notification does not indicate whether you have hit the hard limit, so progress carefully if you are way over your plan's limit

Add Google Analytics to Pages

Monday, October 11, 2021

It's possible to add Google Analytics (GA) tracking code to track your visitors also in pages, such as blog or landing pages, hosted with Loyalistic.

Adding GA code is a quick operation. However you may want to read the following article about how to set up Google Analytics correctly in multiple subdomain scenario as is often the case with Loyalistic.
http://www.ericmobley.net/guide-to-tracking-multiple-subdomains-in-google-analytics/

Adding Google Analytics tracking code to your Loyalistic site

  1. Log in to Loyalistic.
  2. In the upper-right corner, click on the gear icon and select Settings.
  3. On the Settings page, select Branding.
  4. On the Site Styles page, scroll down to locate Scripts / Head Scripts. Paste your tracking code here.
  5. Click Save.

Done! Now the tracking code will appear on all pages.

Dashboard numbers explained

Monday, October 11, 2021

The Loyalistic dashboard shows you the key numbers in a glance. You can see how your content marketing operation is running and how well you are attracting leads.

6 – 10 / 31