Loyalistic has features to help our clients to better meet the requirements set by the EU General Data Protection Regulation (GDPR). Here is an overview on the GDPR-related functionality.
The basis for the processing
The GDPR requires that each contact should have a lawful basis for the processing of the contact's personal information. Usually the basis is either a given consent or some legitimate interest pursued by the company, such as direct marketing.
Here's an overview of the bases for the processing available in Loyalistic.
- None
- No basis has been provided. Contacts with no basis for the processing should be removed from the system.
- Consent
- The contact has given consent for the processing and possibly also marketing.
- Contact
- Processing is necessary for the performance of a contract.
- Legal obligation
- Processing is necessary for compliance with a legal obligation to which you (the company) is subject.
- Vital interest
- Processing is necessary in order to protect the vital interests of the contact.
- Public interest
- Processing is necessary for the performance of a task carried out in the public interest or in the exercise of official authority vested in the controller.
- Legitimate interest
- Processing is necessary for the purposes of the legitimate interests pursued by you or by a third party.
Please take care when assigning the basis for the processing to a contact, as it is your responsibility to make sure that you have a lawful reason for the processing of the contact's personal information. You can change the basis by editing the contact's information, under Additional settings.
Consents
Given consent is the primary basis for storing and handling a contact's information in Loyalistic. You can ask for consent for example on Honeypot forms.
Consent requests
To ask for a contact to give consent, you first need to create one or more consent requests. This can be done at Settings / Compliance Settings / Consent Requests. To add a new consent request, just click on the Add a new consent request button.
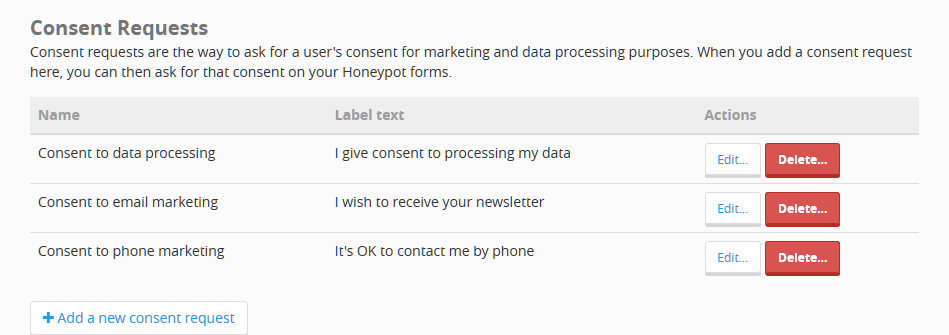
Give the consent request a name (shown only in listing on Loyalistic Suite), select a language, give the consent checkbox text (shown next to the consent checkbox on a Honeypot form) as well as the full consent text. The consent text should be easily understandable and give a clear picture to the contact what kind of consent they are giving.
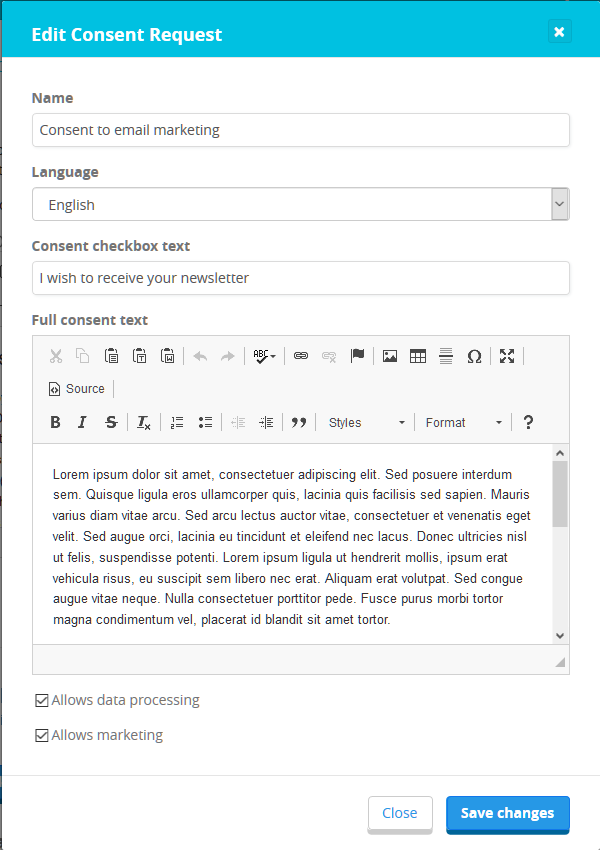
Finally, select what kind of consents are given: just data processing or also marketing. Then click on the Save changes button to save the consent request.
Asking for consent
You can add consent checkboxes to a Honeypot form by editing the Honeypot's settings. Here, you can toggle whether you require a consent to proceed (red exclamation point), or just request it (green check mark).

When a contact fills out the Honeypot form, the given consents are stored in the database. Also, if no other basis for the processing has been given earlier to the contact, then the basis is set to Consent.
How all this affects sending emails?
When you are sending out an email to a contact list or several lists, this is roughly what happens.
- Contacts who have an email sending block in effect (a bouncing address) are removed.
- Contacts who are on the exclusion lists are removed.
- Contacts who have no basis for the processing are removed.
- Contacts who have unsubscribed are removed.
- If your email contains marketing
- Contacts who have a marketing ban in effect are removed.
- Contacts with the processing basis of consent AND which have not given consent for marketing are removed.
- The email is sent to the remaining contacts.
Transparency page
Under the GDPR, a contact has the right to access the personal data collected and stored to a system. In addition, the contact has the right to rectify and delete the personal data as well as withdraw consents or otherwise restrict the processing of their personal information.
Transparency page settings
Loyalistic has a transparency page, which offers a contact a complete view of data collected and stored. To enable the transparency page and its functionality, go to Settings / Compliance Settings / Transparency Page. By clicking on the Edit Transparency Page Settings button, you can set the transparency page functionality on and off, as well as prevent a contact from editing and/or deleting their information.
Should you wish to get a notification by email every time a contact edits and deletes their information, add your email address to the Notification email address box. Whenever a contact updates their information, you will get an email with the old and new contact information.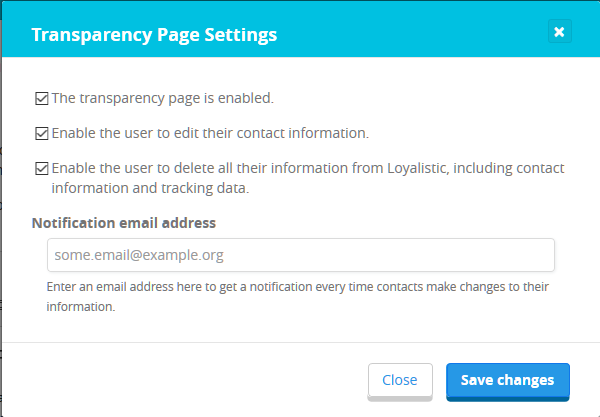
Contact's view
A contact can request access to view, edit and delete their information by entering their email address on the transparency page (https://<yourdomain>.loyalistic.com/transparency/). They will be sent an email with a unique link to access their information. The link is valid for 24 hours.
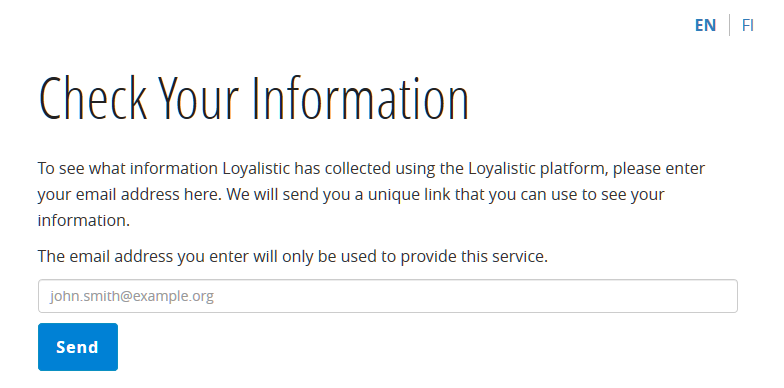
If no data about the person is stored, no link is provided in the email. Instead, the email will inform the recipient that no information related to the email address could not be found.
On the transparency page a contact can see their contact information, as well as given (and possibly withdrawn) consents. Depending on the transparency page settings, they can then correct their contact information or even delete all the personal data stored. The contact can also withdraw any given consents.

The transparency page even gives tools to manage tracking. The contact can forbid Loyalistic tracking completely by clicking the Do not track me on this device link. This is done by placing a special cookie to their browser.
The contact can also download their tracking data. The downloadable file is a zip file, that contains all their email and web tracking data in raw CSV (comma-separated values) format.