Posts in How To

Identify a user using Loyalistic tracking script library

Monday, October 11, 2021

If you have added the Loyalistic tracking script to your website, Loyalistic collects anonymous tracking data about your website users. Only when a user gives an email address, the user is identified and the collected tracking data is associated with that address.

Usually the email address is collected using a Honeypot or a subscription form, but sometimes it is easier to identify the user during some other process, such as when doing a sign-up or filling out an application form. In those cases you can tell Loyalistic the identity (the email address) of the user by using the Loyalistic tracking library.

Note: If you plan to use the collected email address for marketing purposes, please make sure to get a consent from the user before sending the address to Loyalistic.

To identify a user, call the identify() function with an email address as the parameter. For example: loyalistic.tracking.identify("user.email.here@example.org")

You can find the detailed instructions below.

Adding the tracking script

If you haven’t installed the tracking code to your site yet, do the following:

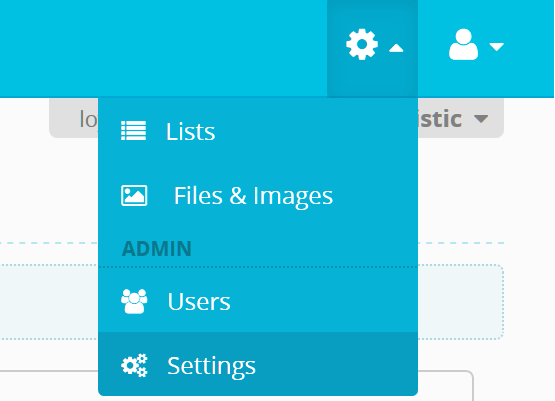
  1. In the upper right corner, click on the gear icon and select Settings.
  2. Under Tracking Code, copy the tracking script HTML snippet and paste it to your web page, just above the closing body tag (</body>).

Identifying the user

After the tracking script has been added to your web page, you can call the identify() function. If you plan to call the function right at the page load, make sure you call it after the tracking script has been loaded. Either put the function call right after the tracking script on the page, or make otherwise sure that the tracking script has been loaded, such as using the following snippet:

Export email recipients to a list

Monday, October 11, 2021

In this article we go through how to create a list from email contacts, who have for example read the email or have clicked a link on it.

Loyalistic provides information on your email recipients: who received the email, who read it, who clicked links on it, which contacts bounced etc. You can create new lists from these contacts.

  1. From the top menu, click on the Emails.
  2. Click on the name of the sent email you wish view.
  3. From the Statistics table, click on the tab you wish to view (for example Opened).
  4. To create a list from the contacts, click on the Export contacts to a list button under the contacts.
  5. In the opening window, give a name to your list. The system suggests a name for you.
  6. Finally, click Save to create the new list and add the contacts to it. Note that the operation might take a while, depending on the number of contacts.


Include/exclude contacts in a list using other lists

Monday, October 11, 2021

This article explains how you can add or remove contacts to/from a list, using other lists as a way to filtering contacts.

Let's say you have several lists for different purposes: one for people from France, one for people located in Germany and so on. You would like to, for example, create a list with both German and French contacts. Or, you would like to for example remove all the French contacts from the newsletter recipient list. How do you do that?

The Include/exclude contacts functionality on the list page is the right tool for this task. For demonstration purposes, let's have three (3) different lists:

  • Marketing list, France
  • Marketing list, Germany
  • Newsletter recipients


Including contacts in a list

In this example, we would like to create a newsletter recipient list with all the contacts from Germany and France. It can be done like this:

  1. Select Settings (the gear icon) / Lists from the upper-right corner.
  2. Open the target list by clicking on it (Newsletter recipients in this example).
  3. Click on the Include/exclude contacts button.
  4. In the Include/exclude contacts window, set the Operation to Include contacts from other list(s).
  5. Check the source lists. In this example, we select both Marketing list, France and Marketing list, Germany.
  6. Click Save. The contacts from the source lists will be added to the target list.


Excluding contacts from a list

Embed honeypot form to your website

Monday, October 11, 2021

Honeypot offers ready-made form pages, which are good enough for most cases. But sometimes you need to embed a form directly to your website. To do just that, Loyalistic supports two ways: either get an HTML form with the necessary scripts, or if you need more flexibility, use our script library to send contact details from any form to Loyalistic.

Embedding an HTML form

The easiest way to collect contact information directly from your website is to use our HTML form code. For example, let's imagine you wish to add a form for your visitors to subscribe to your newsletter. To get the form code, do the following:

  1. In Loyalistic, create a Honeypot with the fields and consents you wish to collect.
  2. On the honeypot's front page, select Embed form on the right-side menu.
  3. Copy the HTML code from the window. The code contains the fields you selected in step 1.
  4. In your website content system (e.g. WordPress), locate the page you want to embed the form to.
  5. Paste the form HTML code to the page. Make sure you add the HTML code in source view of your website editor.
  6. Now you can rearrange the form fields, as needed. Remember to save the changes.


Using the script

Compared to the previous HTML form method, the script is more advanced and requires some knowledge of HTML and JavaScript. On the plus side, the embed script is more flexible and allows you to attach it to virtually any HTML form.

  1. In Loyalistic, create a Honeypot with the fields and consents you wish to collect.
  2. On the honeypot's front page, select Embed script on the right-side menu.
  3. Copy the example JavaScript code from the window. The code contains the fields you selected in step 1.
  4. In your favorite text editor, modify the example code to suit your needs. In particular:
    • Make sure that you set the correct values to the contact object.
    • Call the
      loyalistic.honeypot.submitContact()
      function when submitting the form with the correct parameters, i.e. Honeypot ID and the contact object.
    • Handle the error messages if any, i.e. missing field values.
  5. In your website content system (e.g. WordPress), locate the page you want to embed the script to.
  6. Paste the JavaScript code to the page. Make sure you add the code in source view of your website editor.
  7. Remember to save the changes and check that your code works.

Personalizing emails

Monday, October 11, 2021

You can personalize emails by adding the recipient's first and/or last name, as well as their email address, to the email. This can be done by inserting a special data tag into the email body.

Use {data:FirstName} to add the first name, {data:LastName} to add the last name, and {data:Email} to add the email address of the recipient.

For example, to add a personalized greeting, you could start your email by writing:

Hello there {data:FirstName}

In the actual email it would then become for example:

Hello there Jordan

If the recipient's name is not known, the data tag will just be omitted.


List of personalization tags

11 – 15 / 17